Component tester with STM32 : Part 1 ADC, Resistor
I was always fascinated by the so call "transistor testers" that identify and report pin out, features of pretty much whatever you throw at it. They are based on Atmel 328p chip, the same as arduino nano.
So why not do the same thing with a STM32/Bluepill ? The STM32 is faster, has a better ADC accuracy, more memory, can do float etc... and is not more expensive.
Warning : I'm doing this for fun & to learn, it might contain error & plain misunderstanding
So, i watched a couple of video on the general principle on how they work.
This is not a "port" but a rewrite from ~ scratch. When something is weird, i check what the original one does for comparison.
So how do we measure resistance ?
What we do is a resistor divider with a know resistance value:
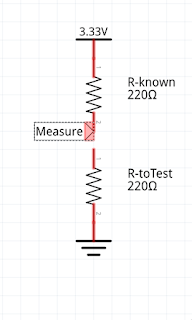
Measure = Vcc*(RtoTest/(RtoTest+Rknown))
As far as the ADC goes, it means
ADC=4095*(RtoTest)/(RtoTest+Rknown))
which can be inverted as
RtoTest=Rknown*ADC/(4095-ADC)
Great, let's put a RKnow=470 Ohm and test it.
Result : Not very good.
The error introduced by this method is linked to the ratio RtoTest/Rknown and looks like that :

Basically, it means the following :
So why not do the same thing with a STM32/Bluepill ? The STM32 is faster, has a better ADC accuracy, more memory, can do float etc... and is not more expensive.
Warning : I'm doing this for fun & to learn, it might contain error & plain misunderstanding
So, i watched a couple of video on the general principle on how they work.
This is not a "port" but a rewrite from ~ scratch. When something is weird, i check what the original one does for comparison.
Measuring resistance
So first thing first : Resistance & Capacitance. These 2 will unlock the other ones.So how do we measure resistance ?
What we do is a resistor divider with a know resistance value:

Measure = Vcc*(RtoTest/(RtoTest+Rknown))
As far as the ADC goes, it means
ADC=4095*(RtoTest)/(RtoTest+Rknown))
which can be inverted as
RtoTest=Rknown*ADC/(4095-ADC)
Great, let's put a RKnow=470 Ohm and test it.
Result : Not very good.
The error introduced by this method is linked to the ratio RtoTest/Rknown and looks like that :

Basically, it means the following :
- If RtoTest is between Rknow/5 and Rknown *5 accuracy is good
- If RtoTest is between Rknown/10 and Rknown*10, accuracy is Okayish, but not great.
- Below and above, accuracy is bad, and goes worse as you get near the limits (0 & 4095).
So if we follow the original tester, adjusted for Vcc=3.3 with have 2 pairs of resistance : 470 Ohm and 300 kOhm
That gives 4 possibilities : 470, 940 300k, 600k
If we follow the rule above (x5, /5, x10,/10), there are gaps : i.e. 940*10=9.4k and 300k/10=30 k
So value between 10 & 30kOhm will be bad etc...
Let's focus on "good" values and see how it performs.
After doing some tests and playing with a spreadsheet, i've neglected the internal resistance of the STM32. It impacts low resistance measures.
I've computed it to be about 20 Ohm
Next, it appears that the ADC is not working well at all when it is near its limits.
- Below 10 or above 4085 -> Bad
- Below 100 or above 3995 -> mediocre
- between 100 and 3995 -> Good
That means that the value with RtoTest small compared to Rknown will have bad accuracy, even if in theory it should be ok (same thing conversely, when RtoTest is big compared to Rknown).
I've compared with my "Transistor tester", the "Transistor tester" was as good or much better depending on the resistance to test.
How is that possible ?
The thing is the Atmel has a 10 bits ADC while the STM32 has a 12 bits ADC
BUT
The original tester is using an external reference of ~ 2V or ~1v, actually zooming on the lower part by a factor 2 or 4, canceling the advantage of the STM32.
I also suspect it does not have the "bad value near zero" issue.
Second, the STM32 ADC is not that noisy. That's good right ?
No necessarily. Let's say we want to measure a value that is 12.2 in ADC value
If you have no noise at all, you take 32 measures, you'll get 32 times 12 => Error =0.2
Let's say you have 1 bit noise, it means in average you'll have 80% of the time 12 and 20% of time 13, due to the noise. If the number of samples is big enough, it will be exactly that.
Average => 12.2. So if you have a bit of noise (~ 1 bit) and do multisampling you get better accuracy.
So for the moment, i'm using 3 resistors for each probe : 470 Ohm, 20k Ohml and 300 kOhm
That gives ~ 0.5% accuracy measured between 50 Ohm and ~ 3M Ohm
I may have to revisit the values later. The drawback is it uses more pins, 3 probes *4 pins = 12 pins
If we add a LCD screen and Rotary encoder, there is not much pins left.
Selecting the good range :
How do we pick up the best combo of Rknown to measure with ?
The possibilities are : 470, 940, 20k, 40k, 300k, 600k
Easy, we try all possibilities, and pick the one with the ADC value closest to the center, i.e. 4095/2=~ 2048.
That's the one giving the best accuracy.
Three ideas for you:
ReplyDelete1. Why use same values for all probes?
Let's focusing on two probes for a minute.
Having 0, X, Y for both probes, lets you have X, 2X, Y, 2Y (and also X+Y, but it's too close to Y).
Instead, you could have 0, X, Y for probe 1 and 0, 25X, 25Y for probe 2, yielding X, 25X, 26X, Y, Y+25X, 25Y, 26Y.
For X=180R and Y=666X=120K you're now covering the range 40R ... 15M within the x5 /5 spec.
With 3 resistors (even on just probe 1) you can have a larger range or higher accuracy.
2. To find the right combination, are you doing some kind of binary search?
3. Alternatively, take ALL measurements into account instead of just the closest to mid-ADC ("supersampling"). Or at least give them weight proportional to the accuracy plot.
The thing is you don't know in advance which pins you'll be using
ReplyDeleteSo if you use different resistors, you may end up in a "bad" configuration depending on the pins used
You could still have one with 0,X,Y, one with 0,5X,5Y and one with 0,25X, 25Y.
DeleteEvery pair of the three is good (and better than uniform 0,X,Y).
And what about supersampling?
Wont work
DeleteLet's say we want to measure X/5, we have 5X and 25X on those pins => bad accuracy
Few weeks ago I worked over the original version of firmware developed for ATmega328. The ideia was convert it to run in ARM STM32F103C8T6 MCU. I stopped for I while since that job is not so easy... If you want a partner to work together in that project please let me know :) !!!
ReplyDeleteThe project is fairly complete, the only part i couldnt figure out is the self/coil measurement. You are welcome to add it :) I have looked at the original ATmega based code, but it's really hardwired to the atmel chip and very difficult to port without it being a mess (more than it is today)
ReplyDeleteIt will be a pleasure to colaborate with the project. How can I have access to souce code you developed ? Was it made under Arduino IDE ?
ReplyDeletehttps://github.com/mean00/stm32ComponentTester
ReplyDeleteUsing cmake , so you can use whatever IDE you like
ReplyDeleteOk. I will take a look and get back to you.
ReplyDeleteI am trying to compile your code using Arduino IDE but I failled... Which module is the main module? There are few missed modules such fancyLock.h. Are they hidden in some where I did not see ? Thanks. By the way, I have downloaded the schematic and prototype photos of my old ideia about the ARM MCU tester. It is very different compared to you schematic ... "https://github.com/AntonioFromBrazil/ARM-STM32F103C8T6-transistor-tester-" As I told the idea is in hold due to technical software difficulties !!! Similar to you I am going back to electronic staff after 30 years. So am rusty
ReplyDelete*stuff
ReplyDeleteMy english is rusty too :)
ReplyDelete1- You probably need to update the submodule i.e. git submodule update --init --recursive to fetch the submodules
ReplyDelete2- Create the project using cmake for your IDE, for example plain Makefile as on the project main page then make
3- The opamp is there to mitigate the input capacitance of the STM32. Else you cannot measure very low cap such as 5pf