Posts

Showing posts from November, 2017

LTC3780 Current limiting, low side

Image
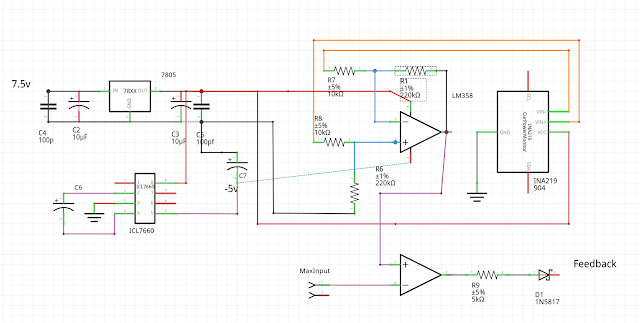
/!\ There is a much better version of that  in the "going to square one" post http://goingbacktoelectronic.blogspot.fr/2018/01/ltc3780-back-to-square-one.html The circuit is pretty simple : The left part generates +5v / -5v from the 7.5v coming from the power supply board. It is to make the LM358 work as much as possible in its linear zone. That way, it is linear down to 10mA, which is accurate enough. The shunt voltage is then amplified by 23, so with a 22 mOhm shunt, we amplify the current by 22 mOhm*23 = ~ 0.5 I measured the output voltage to be : OutputVoltage =  0.52 x Current + 42 mV It does not have to be super accurate, since we'll calibrate it later. Same for the voltage offset (42mV in my case), since we do a comparison afterward, it does not matter much as long as we correct the offset to  display the right value. Last,  we compare the output to the MaxInput. If it is higher, we pull up the feedback pin. Note that if maxInput is > 3.5 V, t

How to fry the LTC3780

Those things are really neat but WAY too easy to fry. I fried the 1st because i was careless The 2nd just due to bad contact in the connector to the front panel. How to fry them ? Easy, use them  without the voltage control resistors , even briefly. (The LTC tries to keep the voltage divided to 0.8v) Result : Instantly burnt How do you detect they are burnt ? They dont go over ~ 2v and the "Power Good" signal goes low when you try to go higher They heat a lot too , consume 200mA without  load.

Revisiting LT3780 power supply - Part 1 - LT board

Image
Finally, improving the current limiting ended up with a much bigger redesign. The previous one was flawed : Need a negative power supply to have linear amplification around zero, very noisy choke nearby,... => Did not work very well. Summary of the new system : Removed current sensing on the LT3870 completely, shorting the 7 mOhm shunt to have a common ground with external components. High side : Just do voltage sensing, no current sensing. Low side :  just do current sensing  + current limiting together Rewrite the INA219 lib to match my needs , i.e.  simpler ina219 on github Use a smaller shunt resistor (20 mOhm) for current sensing Do a full rewiring, cleaner/better this time. Regarding the LT3870 board itself, very little changes : Vmin hardwired to Vcc/2 CC mode => dont care, we dont use it anylonger, it is not connected anyway (diode removed) VC mode => external pots  The current shunt has been shorted  (under the yellow kampton, on the right side o

Overzealous with hot air gun

Image
As i was revisiting my arduino power supply , i changed the shunt resistor on one INA219 board and after that it stopped measuring voltage and current. Not wrong values, zero. I checked the code, looked alright. Time to pull the el-cheapo usb microscope and do some close up on the board Aha ! Good ina : Bad ina : Seems i did not protect the chip from heat enough while soldering the shunt resistor. Oh well, time to learn how to do tiny soldering.

Smart Charger : Daughter Board

Image
Following our  smart charger project  and fixing the ina3221  posts, it is now  time to do the daughter board and finish the hardware side of the project. The daughter board is basically 3 times the following schematic : A couple of gotcha here : There is a cap somewhere on the output+ of the tp4056, so we need a pulldown resistance to discharge it. Without it,  it will take ~ 7 seconds for the battery to not be detected any longer. The TP4056 goes in security mode when a new battery is connected. We have to send a VCharge pulse to make the TP4056 exit security mode. We may overdraw the power supply there, need to fix it later. The TP4056x might draw a lot of current, you might experiment instability if you connect the board to your PC/Mac/Amiga for debugging purpose.  All is fine with a proper usb charger (2.1A !) Source code is available  on github . Now time to fix the bugs and polish.