DSO SHELL 150 K, busted rotary encoder + fix
Update : There is simpler way to fix it.
I had a DSO138 which is a very fun and cheap to do low end oscilloscope job
For basic hobbyist like me, it's perfect
I saw the new generation (DSO150K) with improved user interface, so i bought one
All went well, until i realized i managed to do *2* mistakes :
* Solder the power switch the wrong side, not a big deal
* Solder the rotary encoder the wrong side => That one is a common mistake it seems
After trying to unsolder it, realising there was a shortcircuit, fixing it again and breaking the small PCB holding it, more and more, i completely ruined the whole thing.
I had to dremel the original encoder out and cut the tracks to stop the shorts.
Ultimately, I managed to make it work, it's not that complicated.
First, I bought a new rotary encoder.
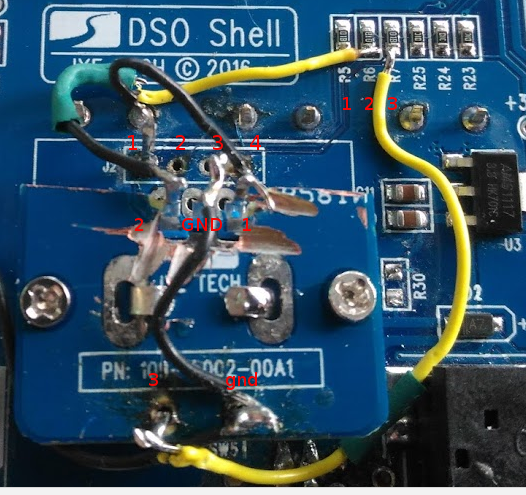
The original 4 pins header is connected to r5/r6/r7/gnd
If, like me you ruined it completely, you can solder small wires to r5/r6/r7, a handy ground is available bottom left (DGND)
Now time to solder the rotary encoder the following way (looking at the back of the encoder)
If the 4 pin header is still there , it's much easier. Double check for shorts !
If like me you have nasty shorts, just make a hole in the small PCB.
WHAT A MESS, but it works (tm)


Thanks MeanX,
ReplyDeleteI managed to install the rotary encoder the other way around, remove it, install it again and realize that the connections 1, 2 and 3 on the small PCB are cut off.
Your blog entry helped me probe the connections and easily repair the problem.
It was fun and now it works great!
next you need to do the lithium battery pack mod :)
ReplyDeletegood jobs.
ReplyDelete